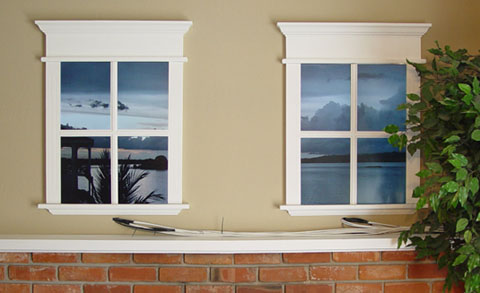
The Virtual Window Project.
Click to see the new version:
The old version:
Last updated: Sept 21, 2004
The old version:
Last updated: Sept 21, 2004

What if only your imagination limited what you could see outside your windows? Flat panel technology is quickly becoming bigger, better, and more affordable, which will allow for all sorts of fun ways to transport your domicile to wherever tickles your fancy. This is my modest attempt to view something more interesting than my neighbors.
WHAT?
The Virtual Windows above consist of eight 15" LCD panels connected via
custom-built cables to two nVidia Quadro NVS 400 PCI video cards, each with four DVI
outputs. The LCD backlight inverters are driven by their own power supply
(sitting on top of the PC) and the panels get their 3.3v power from the PC's ATX
power supply. The total desktop resolution is 3072x2048. A small Visual Basic
app cycles pre-cut images every 15 minutes and Windows manages the arrangement.
The only reason the cables are visible is because the stupid fireplace is in the
way and that wall isn't due to be remodeled for quite a while.
WHY?
So I found myself with access to lots of unwanted 15" panels from work. But
these panels are naked (custom signals, custom connectors, no bezels, etc). So
what's a guy to do with so many LCD panels? Why build a virtual window, of
course! I originally wanted to do full motion video, but at this resolution,
we're way past the PCI bus' bandwidth limits. So that'll have to wait for
Virtual Windows v2.0 with brand spanking new PCIE technology. The reason for
two windows instead of one is simply because the best place for them in my
house is on that wall and the fireplace limits things significantly.
HOW?
Step 1: Proof of concept.


I built a short custom cable and originally used
an LM311 to take the DVI power down to 3.3v. But later I found out that DVI
power is unreliable in mass-quantities, so I pulled power from the PC's 3.3v
line and ran it up each custom video cable.
Step 2: Power for backlight inverter.

Power for the backlight inverters comes from a standalone PC ATX power supply.
Step 3: Profit! Err, I mean tediously build custom video cables.


Boy, Julie was sorry to have said that she wanted to help solder. These wires
are super-tiny. I used two shielded CAT-5 cables to run the video signals to
lengths up to 15 feet. At the DVI business end of the cable, there was
another plug to attach to the 3.3v power line feeding all the panels.
Step 4: Four panels in a prototype configuration.


After a quick bios update to the video cards, we're in business!
Step 5: Build the window frames.


A year (and house purchase and bathroom remodel) later, build the window frames. Victorian
style doesn't really match the house, but oh well.
Step 6: Install them on the wall.


Ripped the texas-inspired wallpaper out, painted, drilled, etc. It was a
challenge to route all those cables behind the panels to keep the LCD panels as
close to the wall as possible. The panels stick out from the wall 1/2", but the
frames hide this fact.
SPECIAL THANKS
Andrew for the video card help. Troy for the frantic work to supply software
for this thing at the last minute. Julie for ideas and help with soldering.
Rufus for a great San Francisco skyline pic. Housemates for putting up with
the mess.
How do I contact the idiot that made this?
Email  .
.
© 2004 Ryan Hoagland